Create Custom WordPress Admin Dashboard
The default WordPress admin dashboard can feel a bit lacking in professionalism. But in this tutorial, I’ll share some simple code that will help you create a custom WordPress admin dashboard that’s both streamlined and user-friendly, complete with helpful shortcuts and tutorial videos for your clients.
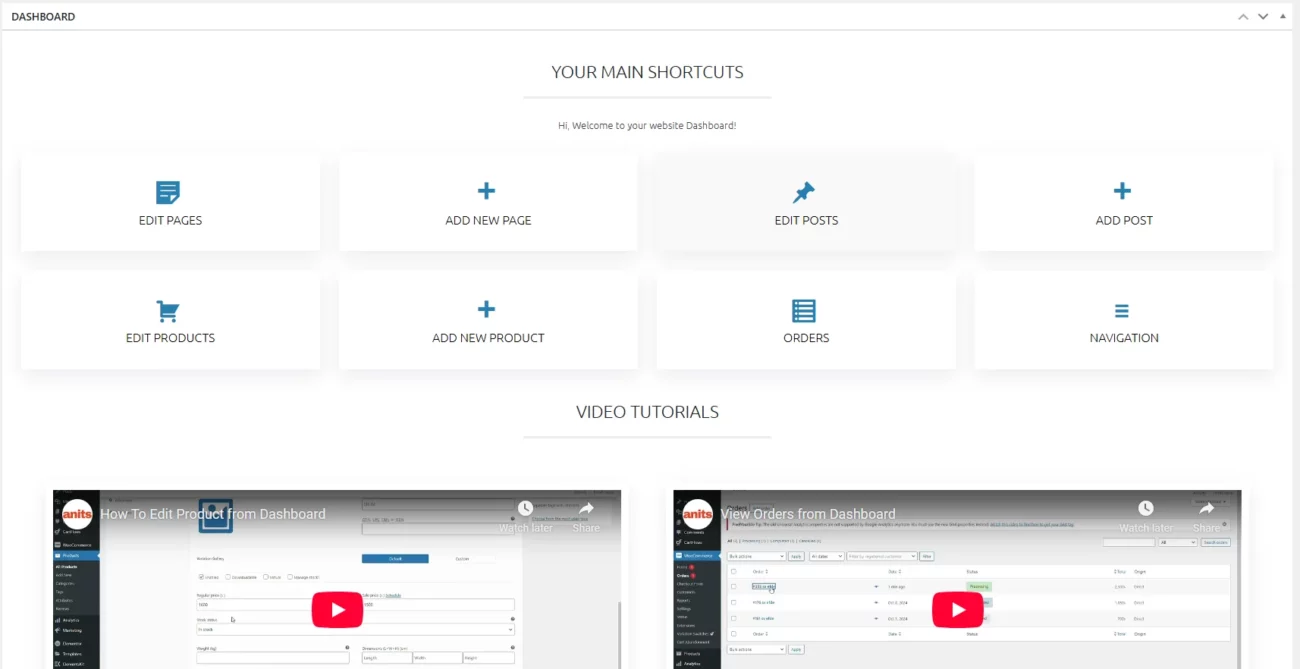
Take a look at the screenshot below (click to enlarge)—this is exactly what we’ll be building together. And the best part? We’re doing it all without any page builders or extra plugins.
For a full preview, check out the video as well. It’ll give you a clear overview of what we’ll achieve and just how easy it’ll be to set up.
Screenshot
Video Tutorial
How to Create a Fully Customized WordPress Admin Dashboard
Let’s get started with a step-by-step guide to creating a fully customized WordPress admin dashboard. Follow each step carefully to transform the default dashboard into Advanced WP dashboard.
Step 1: Remove default WordPress dashboard widgets
We have two option to remove widgets.
- Open Screen options and remove all widgets manually.
- Remove all the default widgets with code snippet.
Now I am sharing the 2nd option. Simply paste the code below inside your child theme’s functions.php file. Alternatively, for easier management, you can use the Code Snippets plugin—this is a great way to add and organize all the snippets from this tutorial without touching theme files directly.
Code:
This content is locked
Login To Unlock The Content!
Code Snippets plugin: Select “Only run in administration area” and hit the button “Save Changes and Activate“
Step 4: Add styles to your custom WordPress admin dashboard
If you skip adding styles to your custom WordPress admin dashboard, it could end up looking even messier than the default dashboard. So, add this CSS code to your Code Snippets for a clean, organized look.
Once again, I added comments for you inside the code so it will be easy to figure out what is what. For example, if you added a link to your orders, your link has class=”orders” and you want to change the icon, then see this part in the CSS code: .orders:beforeI’m using built in Dashicons which you can find here.
// Add custom dashboard with styles

add_action('admin_head', 'custom_dashboard');
function custom_dashboard() {

  echo '<style>
 @import url("https://fonts.googleapis.com/css2?family=Ubuntu:wght@300&display=swap");

/* Make dashboard full width */
#wpbody-content #dashboard-widgets #postbox-container-1 {
    width: 100%;
}

/* Remove default dashboard column border */
.postbox {
border: none;
}

/* Customize columns */
.icon-container p { /* regular text */
	font-size: 16px;
	text-align: center;
}
hr { /* divider */
  height: 3px;
  background: #ebebeb;
  border: none;
  outline: none;
  width:20%;
  margin:1em auto;
  position: relative;
}
iframe {
margin-bottom: 1em;
}
.icon-container { /* customize icon shortcut columns. Add or remove 1fr for adding or removing columns */
  display: grid;
  grid-template-columns: 1fr 1fr 1fr 1fr; / * four columns */
  padding: 20px;
  text-align: center;
  font-family: "Ubuntu", sans-serif;
}
.video-container {  /* customize video columns */
  display: grid;
  grid-template-columns: 1fr 1fr ; /*two columns*/
  padding: 20px;
  text-align: center;
  font-family: "Ubuntu", sans-serif;
}
.default-container {  /* customize heading and contact form containers */
  display: grid;
  grid-template-columns: 1fr ; /* one column */
  padding: 20px 20px 0px 20px;
  text-align: center;
  font-family: "Ubuntu", sans-serif;
}
.column, .video-column {
 box-shadow: rgba(149, 157, 165, 0.2) 0px 8px 24px;
}

@media (max-width: 520px) { /* for screens up to 520px. Modifies all container types */
  .icon-container, .video-container, .default-container {
    grid-template-columns: none;
	padding: 0px;
  }
}
@media (min-width: 521px) and (max-width: 767px) { /* for screens between 521 and 775px. Modifies only icon shortcut columns */
  .icon-container {
    grid-template-columns: 1fr 1fr;
	padding: 0px;
  }
}
@media (min-width: 768px) and (max-width: 990px) { /* for screens between 786 and 990px. Modifies only icon shortcut columns */
  .icon-container {
    grid-template-columns: 1fr 1fr 1fr;
	padding: 0px;
  }
}
    .column, .video-column { /* customize icon shortcut columns */
      background: #fff;
	  color: #000;
	  padding: 30px;
	  transition: background-color 0.5s ease;
	  text-transform: uppercase;
	  font-family: "Ubuntu", sans-serif;
	  font-size: 16px;
	  text-align: center;
	  text-decoration: none;
	  margin: 3%;
    }
	.column:hover, .video-column:hover {  /* customize icon shortcut and video column hover style */
	background: #f9f9f9;
	}
	  .video-column { /* customize video columns */
	  padding: 10px 10px 20px 10px;
    }
		.column a, .video-column a { /* link colors */
	color: #000 !important;
	text-decoration: none;
	}

	/* SHORTCUT ICON CUSROMIZATION. It uses Dashicons, see here https://developer.wordpress.org/resource/dashicons/#menu-alt */

	.edit-pages:before { /* Edit pages */
	font-family: "dashicons";
	content: "\f123";
	font-size: 34px;
	margin-right: 7px;
	display: block;
	color: #2681B0;
	}
	.edit-posts:before { /* Edit posts */
	font-family: "dashicons";
	content: "\f109";
	font-size: 34px;
	margin-right: 7px;
	display: block;
	color: #2681B0;
	}
	.add:before { /* Add icon */
	font-family: "dashicons";
	content: "\f132";
	font-size: 34px;
	margin-right: 7px;
	display: block;
	color: #2681B0;
	}
	.edit-menu:before { /* Navigation icon */
	font-family: "dashicons";
	content: "\f329";
	font-size: 34px;
	margin-right: 7px;
	display: block;
	color: #2681B0;
	}
	.edit-orders:before { /* Orders icon */
	font-family: "dashicons";
	content: "\f163";
	font-size: 34px;
	margin-right: 7px;
	display: block;
	color: #2681B0;
	}
	.edit-products:before { /* Products icon */
	font-family: "dashicons";
	content: "\f174";
	font-size: 34px;
	margin-right: 7px;
	display: block;
	color: #2681B0;
	}
	}
  </style>';
}
Code Snippets plugin: Select “Only run in administration area” and hit the button “Save Changes and Activate“
Finally: We’ve customized the WordPress Admin Dashboard!
If you followed each step, you should now have a completely transformed WordPress dashboard that’s cleaner, more functional, and tailored to your needs.
If you have any questions or comments, feel free ask your questions here—I’ll be happy to help!